Kaiwa Vox: new Kraftor firmware and Kaiwa Designer

Kaiwa Vox has a new Kraftor firmware and a dedicated browser-based Designer. Turn Japanese phrases into a robotic voice, shape their delivery, and play them from a MIDI keyboard or sequencer.

The release pairs Kaiwa firmware 1.0.2 with Kaiwa Designer 1.2. It is made for Kraftor fitted with a Kaiwa Vox board.

Write the words, shape the voice

Open Kaiwa Designer in Chrome or Edge on a desktop computer and connect Kraftor over USB. Enter Japanese in romaji, using Latin letters and the AquesTalk phonetic notation, then press Speak to hear the hardware.

Four controls change the delivery: Speed, Pitch, Accent and Vowels. Short phrases can become clipped robotic speech or slow, stretched chants. The Heart Sutra example in the user manual is a starting point for exploring the longer vowel settings.

Build a phrase bank and play it over MIDI

Edit 20 temporary RAM phrases, or store up to 100 phrases with the optional RC256 FRAM. Fill a bank from pasted text and print a MIDI reference sheet for the saved phrases. USB MIDI or Kraftor’s TRS MIDI Type B input can trigger playback and control the voice.

Clearer limits and explicit FRAM formatting

Designer 1.2 checks the phrase length after vowel elongation and shows the highest Vowels setting that fits. If a phrase would exceed the chip’s 127-byte limit, it suggests reducing Vowels or splitting the phrase.

Firmware 1.0.2 preserves unrecognized FRAM data at startup. The Designer’s Format FRAM button lets you explicitly create an empty Kaiwa bank when switching firmware. Formatting erases the existing FRAM contents, so back them up with the original firmware first.

Open Kaiwa Designer · Download the Kraftor firmware · Read the user manual


Console now has a talking head

Console now has a talking head. The latest version adds an animated 3D face to the browser-based visual companion for hardware speech synthesis.

In this demo, my DAW controls RoboVox inside Kraftor via MIDI. Kraftor sends the phoneme names over serial to Console, where a lookup table maps each phoneme to a mouth shape, called a viseme. The head follows the incoming phoneme stream as RoboVox speaks.

DAW → MIDI → Kraftor / RoboVox → Serial → Console

Choose a wireframe or shaded face, turn the head, adjust its size, or switch to a mouth close-up. The audio-reactive scope can run behind the head, combining the waveform with the facial animation.

Console runs directly in the browser, and its source code is available on GitHub. Use a Web Serial-compatible browser, such as Chrome or Edge, to connect to the hardware.

Try Console · Source code · Kraftor


VAX firmware update: MIDI voices and live text output

The VAX firmware update brings full-range MIDI voice selection and live text output to Kraftor. CC16 selects all nine DECtalk voices across values 0-127, with each voice keeping its natural settings until you adjust them. Spoken sentences are also sent over USB serial for display in Console.

The remote controller in this demo is my new Teletype. It plays Kraftor running the VAX firmware, triggering saved DECtalk phrases over MIDI and shaping their voices with the controller knobs.

VAX now sends the spoken sentence back over USB serial. Console receives the text, removes the DECtalk commands from the display, and turns the words into large text with visual effects. The performance in the video is live.

The updated VAX Designer runs in your browser. Write a sentence, choose and shape its voice, audition the result, then save it to Kraftor. Saved phrases can be played over MIDI without the Designer connected.

Console is an optional visual output. Its word slicing follows an estimated speech rate rather than detecting words in the audio.

VAX firmware and tools · Teletype MIDI controller · Console software


Meet Teletype: hands-on MIDI control for Kraftor

Meet Teletype, a compact MIDI controller for playing synthetic voices with your hands. Five hinged keys trigger sounds and phrases, while four knobs let you shape the performance. It is designed as a companion for Kraftor, and also works with compatible MIDI instruments and software.

Blue Teletype MIDI controller beside Kraftor
Teletype with Kraftor. Kraftor is sold separately.

A small controller with room to play

Two bank switches give the five keys access to 20 note assignments. Set up one bank for phonemes, another for allophones or stored phrases, and use the knobs for parameters such as pitch, speed or modulation. The available sounds and controls depend on the voice board and firmware in your instrument.

Each knob can send a MIDI Control Change message or pitch bend. The keys and knobs have independent MIDI channels, so note triggers and continuous controls can address different parts of your setup. The keys send short triggers; holding a key does not sustain a note.

Configure once, then play

Open the Teletype browser interface in desktop Chrome or Edge to choose notes, knob assignments and MIDI channels. Apply your changes and save them on the controller. The settings survive power-off, and the interface is no longer needed once setup is complete.

For a hardware setup, power Teletype by USB and connect its Type B TRS MIDI output to your instrument with a suitable cable. You can perform without a computer. USB MIDI also lets Teletype control software, and the optional browser Monitor view shows incoming MIDI as you play.

Choose your colour

Teletype is available in red, beige, black, white, blue, green and orange. It weighs 160 g and ships from Belgium. The photos show the blue version.

The firmware source, documentation and ready-to-flash UF2 are available on GitHub. Firmware updates can be installed with the browser uploader, without compiling.

Explore Teletype and choose your colour →


Use a USB keyboard for text entry

Use a standard USB keyboard to enter some text and have it spoken live on VAX (soon on Kaiwa and Emy).

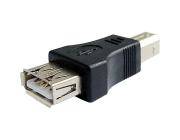
The keyboard is connected to a USB gender changer (provided with the last edition of Emy ) which also powers the keyboard.

The speech can be triggered by the Gate signal, pressing the rotary or by pressing Enter on the keyboard.
Basic editing is possible with the backspace character while the Escape key is erasing the current text.

There is also a gate out signal on the Busy/Aux jack that stays up while the keyboard is pressed (it is not needed for the speech but I thought it could be fun to use it)

The newer version of Emy’s PCB 1.0c allow powering the keyboard but If your PCB is 1.0b you will need to apply the following hack.

  • Add a Schottky diode (like the BAT85) between the +5v via end the USB connector like shown here :

  • Be careful not to overheat the via while soldering it.
  • Do not use this port to power something else than a normal keyboard. The maximum current that can be provided is 300 ma.

Enjoy your new talking keyboard!

This works great with wireless keyboards too and allows triggering the speech from quite a distance.


How to add new vocabulary to Talko, the easy way

Previously, I had described here: how to do compress sound using a venerable Windows 3.1 tool: Qbox Pro. The process what quite long to set up and does not always produce good results.

Today I discovered BlueWizard from this post.

BlueWizard runs on Mac and allows to tweak the process in real time to optimize the output!  The author has been kind enough to make some small tweaking just for the Arduino and Talko!

Simply open your file (which has to be recorded at 8 kHz with 16-bit depth ), click on the 2 tick boxes:
– “include hex prefix (0x)” to allow direct pasting into the Arduino IDE
(if you are using it for Emy’s SD card do not tick this box)

  • and “include explicit stop frame” to avoid the library producing gibberish noise a the end of the sound

then copy the resulting the data from the “Byte Stream” windows.

Bluewizard

Open the Arduino IDE and paste the data stream into your code before uploading it to Talko.

Let’s make  a sound and process it:

say -v"alex" "We are charging our battery. And now we are full of energy. We are the robots." -r 100 -o roboter.wave

converting to 8 kHz with 16-bit depth using SoX

sox roboter.wave -r 8k -b16 roboter.wav

and the compressed version made with Talko :

the Arduino code:

// Talkie Adafruit library
// Copyright 2011 Peter Knight
// This code is released under GPLv2 license.

#include "talkie.h"

Talkie voice;

const uint8_t spROBOTS[] ={0xa6,0xd6,0x4a,0x67,0xd8,0xed,0xa8,0x9a,0x35,0x37,0xd5,0x8a,0x1c,0x72,0xbf,0x84,0xcd,0x2a,0x4a,0xca,0x42,0x50,0x77,0xed,0x6a,0x25,0xcb,0x1a,0xb3,0xa3,0xa3,0xa4,0x34,0x4b,0xb2,0xe9,0x0c,0x9b,0xd2,0xc4,0xd9,0xa7,0xca,0x6c,0x49,0x8a,0x26,0x9d,0xaa,0x28,0x2d,0xc9,0x96,0xad,0xbc,0xaa,0xb6,0x24,0x47,0xb5,0xd0,0x1c,0xd3,0x92,0x9c,0xcd,0x43,0x7c,0x68,0x4b,0x72,0xd6,0x2c,0xf6,0xa2,0x25,0xcd,0x9d,0xb3,0x4d,0xc6,0xa4,0xb4,0x4c,0x8a,0x32,0x19,0x9d,0x92,0xb2,0xc8,0xd2,0x79,0x92,0x89,0xeb,0x14,0x36,0xd3,0x26,0x04,0xd8,0x79,0x2c,0x01,0xbb,0x5e,0xb6,0x68,0x8e,0xed,0x2e,0x8b,0xdd,0xea,0x51,0xd3,0xd3,0x35,0x4e,0xcb,0x73,0x74,0xf3,0xd4,0x38,0xa3,0x4c,0xd9,0xdd,0xc3,0xed,0x96,0x2a,0x76,0xb5,0x36,0x5d,0x9c,0xaa,0x38,0x4c,0xc7,0x75,0x52,0xaa,0xc3,0x14,0x5b,0xb3,0x51,0xa1,0x0e,0xdd,0x64,0x92,0x4f,0x86,0x3a,0x54,0x89,0x31,0x99,0x98,0xea,0x58,0x38,0x27,0x64,0x42,0xa8,0x73,0x81,0x49,0x8b,0x91,0xa6,0x4e,0x19,0x36,0x22,0x4a,0x88,0x3a,0x25,0x98,0x0c,0x2b,0x69,0x9a,0xa4,0x49,0xbd,0xb2,0x56,0x69,0x46,0x55,0x66,0xd5,0xb6,0xa5,0x19,0x95,0xd8,0x2c,0xda,0xb4,0xa6,0x5a,0x52,0x8f,0xac,0x53,0x9a,0x62,0xd1,0xab,0x2a,0x72,0x68,0xb3,0xc1,0xd8,0xcc,0xd0,0xae,0x8b,0x8a,0xe2,0xd2,0x4c,0xb9,0x4e,0x1b,0xed,0x56,0xb7,0x62,0x3a,0x63,0xa4,0xdd,0xd3,0x4a,0xe8,0x8a,0xc1,0x95,0x52,0x45,0xa9,0x2d,0x16,0x47,0xcb,0x94,0xb4,0xa6,0x65,0x2a,0x8b,0x92,0xdb,0x9a,0x5a,0x25,0xd2,0x2a,0x6c,0xab,0x6b,0x93,0x32,0x6f,0xab,0xa3,0xce,0xd5,0x32,0x2d,0xeb,0xb4,0x3a,0x55,0xcb,0x32,0x7f,0x54,0xea,0xd8,0xac,0x5a,0xed,0x76,0xaa,0x63,0xb7,0x18,0x93,0xcb,0xa1,0x8e,0x43,0x7d,0x54,0xae,0x84,0x3a,0x0e,0x8e,0x15,0x99,0x93,0xea,0x58,0x38,0x43,0xbd,0x32,0xab,0x6d,0xe2,0x0c,0xd7,0x21,0xa4,0x8a,0x5a,0xc2,0xc3,0x62,0x95,0xac,0x24,0x71,0xf7,0xa8,0x55,0x8a,0xe4,0xb9,0xdd,0xcb,0x48,0x2b,0x72,0xb0,0x68,0xcb,0x30,0x23,0xcf,0x49,0xa3,0x3c,0x43,0xb7,0x34,0x17,0xad,0xb4,0x32,0xd3,0xd2,0xd2,0xa4,0xdd,0xdb,0x6c,0x4b,0x73,0x93,0xb6,0x28,0xa9,0x25,0xcd,0x4d,0xda,0x23,0xa5,0x96,0x3c,0x16,0x1b,0x8b,0xb0,0x9a,0xca,0x50,0xbc,0x2c,0xdd,0x6a,0xa8,0x93,0xd7,0x96,0xb2,0xb0,0xae,0x2d,0x51,0x92,0xd3,0x2b,0x87,0x3e,0x17,0x0e,0x6d,0x19,0xeb,0x86,0x34,0xb1,0x35,0xb4,0xaa,0x19,0xe2,0x80,0xd1,0xf4,0xaa,0x66,0x88,0x1d,0x46,0x23,0xa3,0xba,0x21,0x35,0x1c,0x89,0x8e,0x1a,0x86,0x92,0xa1,0x3c,0xb2,0x6c,0x18,0xb3,0x61,0xad,0xb1,0xd8,0x61,0x2c,0x86,0xa4,0x26,0xa2,0x84,0xa9,0x28,0xd2,0x9a,0x8c,0x1d,0xa6,0x66,0x88,0x63,0x2a,0x4e,0x98,0xba,0x61,0xf2,0x99,0xd0,0xee,0x1f,0x0a,0xc5,0x2b,0xad,0x88,0x7f,0x6a,0x50,0x6f,0xb5,0x03,0x00,0x00,0x00,0x00,0x00,0x00,0x00,0x00,0x00,0x00,0x00,0xee,0xad,0x49,0x32,0x2b,0xa3,0xb6,0xa2,0x46,0x75,0xcf,0x2c,0xdd,0x8a,0xe2,0x34,0x33,0xd2,0x4c,0x2b,0x8a,0x93,0xb2,0x0e,0x29,0xad,0x2c,0x5e,0xd2,0xab,0x24,0x97,0x32,0x3b,0x49,0xef,0xa4,0x6c,0x4a,0x69,0x74,0xad,0x8c,0x89,0xa9,0x84,0xd1,0xd3,0x66,0x47,0xa6,0x92,0x5a,0xcf,0x5a,0x1c,0x9b,0x8a,0x5b,0x5b,0x0b,0x75,0xa2,0x2a,0x18,0xe3,0x3c,0x4c,0x89,0xa8,0x40,0x8e,0x75,0x37,0x39,0xa9,0xf4,0x5a,0x2b,0xad,0xe8,0xb4,0x3c,0x59,0x2b,0xcf,0xa0,0xd2,0xb2,0x9c,0x24,0x3d,0x53,0xca,0x48,0x4a,0xd5,0xb4,0x48,0x39,0x2d,0x2e,0x55,0x4b,0x33,0xe4,0xb4,0x38,0x37,0x2d,0x29,0x97,0xdd,0x92,0xdc,0x2d,0xd5,0x5b,0xca,0x48,0x52,0x8d,0x0c,0xab,0xc8,0x2d,0x4d,0xa5,0x22,0x34,0xcb,0x94,0x2c,0xb6,0x76,0xb7,0x1c,0x53,0xf2,0xd0,0x2a,0x4d,0xb3,0x4a,0x2a,0x43,0xef,0x10,0xcb,0xc9,0xae,0xb4,0x7d,0x9c,0xd5,0xeb,0xa8,0x5a,0x95,0x4d,0x62,0xab,0x6d,0x1a,0x95,0x37,0xc8,0xad,0x74,0x68,0x54,0x4a,0x37,0xcf,0x2a,0xa1,0x75,0xd6,0x2a,0xa3,0xc2,0xa4,0x2e,0x69,0xf6,0xae,0x2a,0x5d,0xba,0x62,0x48,0x33,0x6b,0x72,0x69,0x5b,0x24,0xb1,0xaa,0x29,0xad,0xed,0x99,0xd9,0xc2,0xa7,0xb4,0xa6,0x7a,0x55,0x77,0x9d,0xd3,0x9a,0xe2,0xdd,0xc3,0x65,0x76,0xab,0x73,0xc8,0x28,0xa7,0x45,0xad,0x4e,0x39,0xb3,0x9c,0x96,0x94,0x2a,0xf5,0x88,0x50,0x9d,0xe2,0xaa,0xf8,0xb0,0x8a,0xbc,0x91,0xa9,0xe2,0xa1,0x68,0xd2,0xc6,0xae,0xce,0x2e,0xc3,0xcd,0x2c,0xbb,0x75,0xf8,0x8e,0x0c,0xb3,0xad,0x80,0xe5,0xba,0x14,0x30,0x43,0x87,0x02,0x56,0xac,0x48,0xe7,0x70,0x61,0x61,0x96,0x34,0xc5,0xc9,0x54,0x44,0xa8,0xe3,0x54,0xf8,0x56,0xaa,0xee,0x4d,0x52,0xe9,0xcb,0x18,0x5b,0x2c,0x4a,0x65,0x08,0x93,0x2c,0xf6,0x28,0x94,0xbe,0x8e,0x52,0xe4,0xa4,0x50,0xfa,0xb0,0x41,0x16,0x97,0x5c,0x69,0xd2,0x39,0x5b,0x4e,0x09,0x65,0xf0,0x93,0x42,0x35,0x25,0x95,0x21,0xb4,0x99,0x76,0xb9,0x52,0x46,0x57,0x16,0xb2,0x61,0x5b,0x99,0x5c,0x9a,0x59,0x47,0x29,0x65,0x92,0x63,0x62,0x55,0xb6,0x54,0x99,0x8d,0xa9,0xc7,0x98,0x54,0x47,0x55,0xe6,0x16,0x93,0x5d,0x9b,0x65,0xa8,0xa9,0x57,0x71,0x6d,0xd2,0xec,0x69,0x56,0xba,0x35,0xc5,0xa9,0x85,0xe4,0xe8,0xd1,0x14,0x6f,0x9e,0x56,0xa3,0x46,0x53,0xbd,0x79,0x6a,0x97,0x2e,0x75,0x4e,0x12,0x19,0x2d,0x26,0xd4,0x29,0x70,0xf2,0x98,0xe5,0x50,0x25,0xcb,0xc5,0x6b,0xa1,0x53,0x9d,0x03,0xb5,0x96,0x06,0x0d,0x75,0x4e,0xd8,0x56,0x56,0xd4,0x35,0xb9,0x60,0x45,0xe8,0x50,0xd7,0xe6,0x0a,0x99,0xa5,0x47,0x5c,0x57,0x2a,0x78,0x94,0xce,0x12,0x43,0x0a,0x50,0x5e,0x51,0x29,0x8c,0xa3,0xa6,0x10,0x6a,0xb2,0x04,0xcc,0xd1,0x5e,0x86,0x99,0x94,0x59,0xbd,0x53,0x1a,0xab,0x61,0xf1,0xea,0x44,0x69,0xcc,0x86,0x2c,0x36,0x23,0xa7,0x31,0x5b,0xd6,0xb8,0x88,0x55,0xc6,0xe6,0x58,0x64,0x72,0x4e,0x19,0xbb,0x67,0x91,0xca,0xc5,0x65,0x1c,0x81,0x45,0x22,0xe6,0xa4,0xb1,0x7b,0x66,0xa9,0x9c,0x92,0xa6,0xae,0x59,0xac,0xb3,0x76,0x9a,0xba,0x66,0xf6,0x89,0xc8,0x61,0xee,0x96,0xd8,0x27,0x42,0x9b,0xb9,0x19,0xe4,0x18,0xb7,0xa2,0xe6,0xa6,0x90,0x7d,0x23,0x8a,0x58,0xaa,0x25,0x96,0xd2,0xa8,0x00,0x00,0x00,0x00,0x00,0x00,0x00,0x00,0x00,0x00,0x00,0x00,0xea,0x65,0x21,0x3a,0xc9,0xc3,0xa8,0x9e,0xf9,0xe8,0x06,0x8f,0x6c,0x3a,0x51,0xcc,0x55,0x7a,0x74,0x68,0xad,0xd7,0x4c,0xaf,0x22,0xa9,0x2b,0x06,0xb5,0x3b,0xca,0x86,0xae,0x1a,0xd4,0xea,0x2a,0x1c,0xba,0xac,0x51,0xab,0xa3,0x4c,0xe9,0xb2,0x12,0xe9,0x72,0xdb,0xad,0xab,0x8e,0xa5,0x23,0xa2,0xb4,0xb6,0x04,0x89,0xd4,0x0a,0x9b,0xda,0x54,0xa5,0x3c,0xd2,0x58,0x6a,0xe2,0xd0,0x72,0xf5,0xb2,0xa9,0x49,0x5d,0xab,0x45,0xc7,0x86,0x26,0x0f,0xee,0x61,0x1b,0x1a,0x9a,0x34,0xa4,0x8b,0x6d,0x68,0x68,0xd2,0xe0,0x4e,0xf6,0xa1,0xa9,0xc9,0x8d,0xda,0xd5,0xcb,0xa6,0x36,0x25,0x8e,0xf0,0x8c,0x5c,0xda,0xec,0x55,0xd2,0x33,0xb6,0x69,0x83,0x51,0xa9,0x28,0xcb,0xa9,0x09,0x26,0xad,0xbc,0x8b,0xa4,0x36,0x3a,0xf7,0xb2,0x2a,0x13,0xba,0x10,0xb9,0x3c,0xa3,0x96,0xe9,0x7c,0xa6,0x8a,0xb4,0x46,0xa6,0x33,0x49,0x2d,0x4a,0x5c,0xbb,0xce,0x14,0x33,0x2d,0x63,0x1b,0x1a,0xdf,0xc4,0x22,0xcc,0x6d,0xa8,0xfc,0xa4,0x8c,0xb0,0xd4,0xa5,0x0c,0x39,0x5d,0xc2,0x6a,0xb5,0x3c,0xa4,0x76,0x35,0x9f,0x53,0xb2,0x10,0x26,0x54,0xfd,0x61,0xc9,0x82,0xdb,0x54,0xd5,0x87,0x29,0xf7,0x71,0x43,0xc4,0x6f,0x86,0xc2,0x87,0x75,0x72,0x9f,0xa8,0x1a,0x95,0xdb,0xc4,0x7c,0x32,0x19,0x69,0x2a,0x13,0xf5,0x38,0xa9,0x0b,0xa1,0xd2,0x45,0xa7,0xa4,0x3e,0x94,0x56,0x77,0x1f,0x13,0xc6,0xd0,0x4b,0xc3,0xb3,0x4c,0x1a,0x63,0x1d,0x09,0x8f,0x32,0x65,0x4a,0xa9,0x23,0x38,0xcb,0xa6,0x39,0xa5,0xf6,0x10,0xaf,0x92,0xe6,0xd4,0x32,0x4c,0xdb,0x4a,0x59,0x52,0xce,0x48,0xe9,0xb0,0x69,0xc9,0xd9,0xcb,0x74,0xa4,0xb9,0x25,0x45,0x2d,0xf3,0x14,0xa3,0xd6,0x62,0xc3,0x5d,0xdd,0x34,0x59,0xba,0x74,0xcf,0x08,0x4b,0x08,0x58,0xa9,0xc3,0x30,0xc3,0x65,0x84,0x7b,0x1c,0x0,0x0,0x0,0xf0,0xff,0xff};

void setup() {
}
void loop() {

     voice.say(spROBOTS);
}



New Talko firmware : VCO mode can play semi-tones

The rev 2 of Talko’s firmware can now play notes over 2 octaves.

It may seem obvious to have a 1V/octave CV to note in a VCO mode but this was quite challenging to achieve.  (I may explain the process in another post as it  could be also applied for  another of my speech synths)

Connections

Quite easy:  just feed a pitch signal into the Pitch entry. Tune the synth up and down with the Bend pot and trigger the note with the Gate.
Set it to Bank 16 and play with the Sound pot to choose among the 26 vowels sounds.

(*) Please note that the Microbrute’s gate out can’t trigger Talko directly (it’s a Microbrute know impedance issue): use a gate buffer in between.

Sounds

The VCO sound very much like an organ and it’s quite fun to pass the audio through a guitar pedal like the Zoom 505:

#Talko new firmware : the VCO mode can now play semi-tones ! #arturia keyboard driving #talko pitch cv in . I apologize for my poor keyboard skill (^_^)

Une publication partagée par Jean-Luc Deladrière (@polaxis) le

The Microbrute can also send notes via its sequencer: this allows instant fun for the poor keyboard player like me!

#talko in VCO mode with the #arturia #microbrute as sequencer

Une publication partagée par Jean-Luc Deladrière (@polaxis) le

Firmware

The code is available here:  Talko 1.2 rev2
Right click to save it as a .hex file and use Easy uploader to install it into Talko.

User Manual

The manual has been updated to reflect  this revision : https://www.polaxis.be/wp-content/uploads/2016/05/Talko-Manual-1_2.pdf


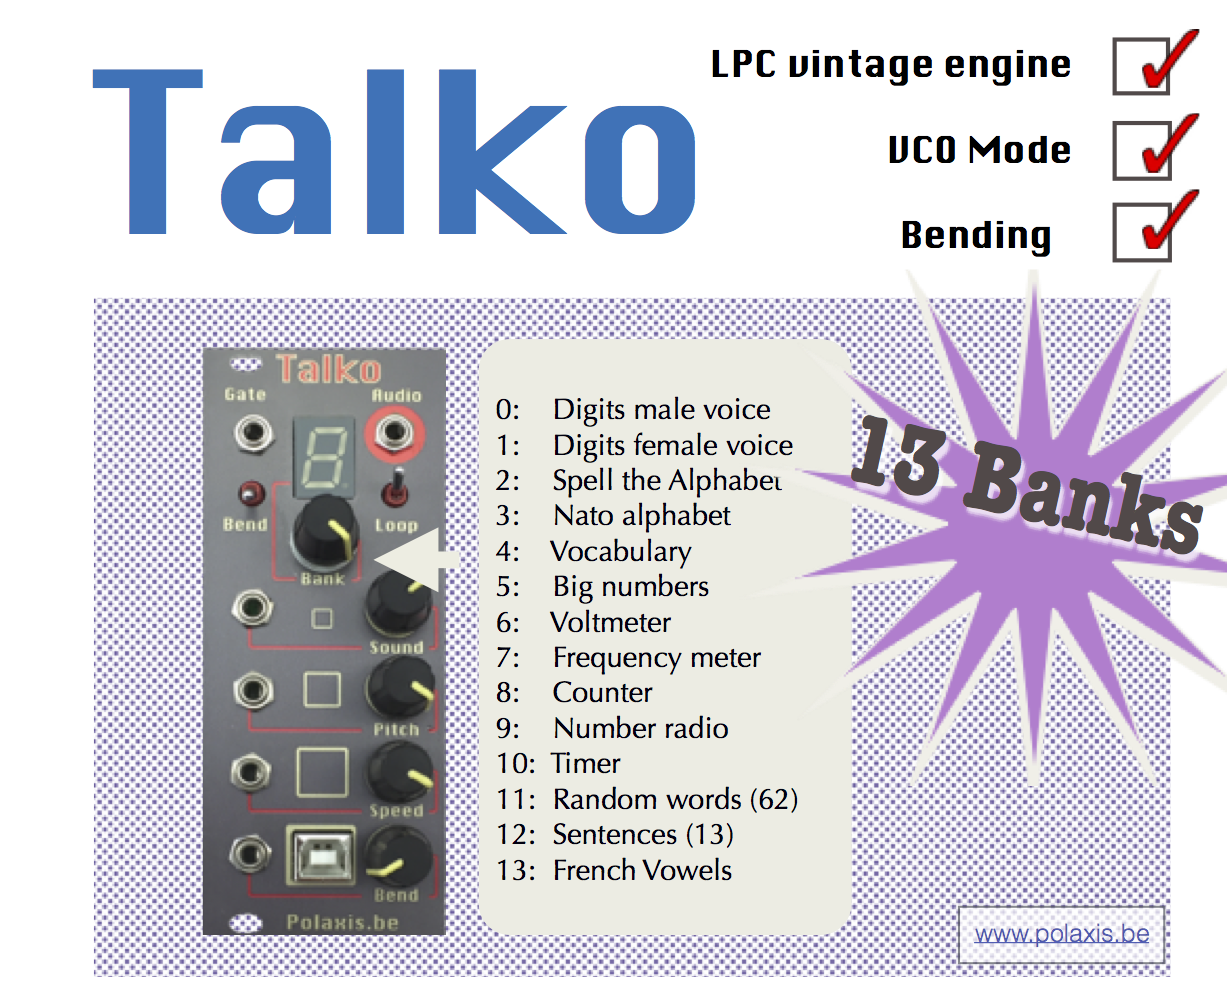
3 new sounds banks for Talko

Talko’s code has been updated with 3 new sounds banks :

Bank 15 : French Vowels Male (5)


Bank 16 : English voiced allophones (72)

Bank 17 : VCO friendly voiced allophones (25)

This bank is a selection of allophones from bank 16 that produces nice looping sounds in VCO mode (great for mouth drumming for example)

The new code is available here
and can be uploaded with Easy uploader as described on the downloads page.

The updated manual is to be found here.

Have fun !


Talko 1.2 now available

IMG_5620-copie.jpg
Talko 1.2 are now in stock, both as kits and as assembled modules.

What’s new in version 1.2

  • Rotary encoder for smoother Bank change
  • Encoder’s button can be pressed to simulate the gate signal going HIGH and make the module speak.
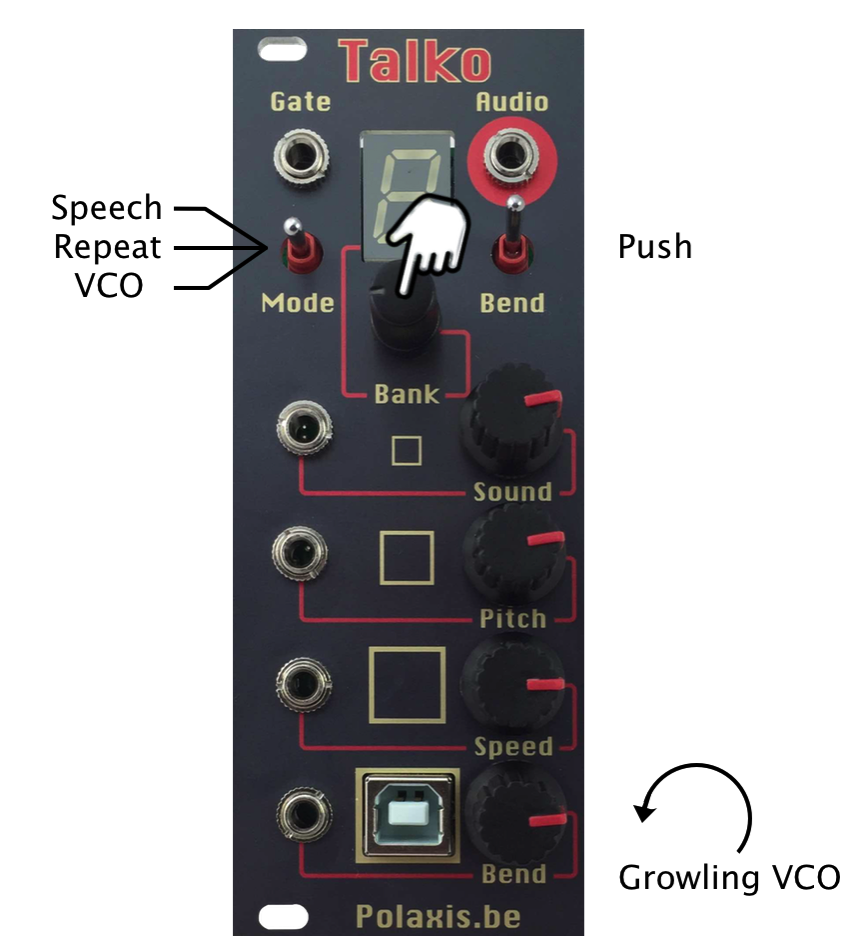
  • Mode selection via a 3 positions switch : Speech – Repeat – VCO
  • Growling mode in VCO (turn the Bend pot fully CCW)

Talko-New-panel.png

My first patches

Beyond having it to speak and bending it in (the obvious) Speech mode, I would recommend testing the Repeat mode by feeding some rhythmic pattern into the Gate entry and particularly playing with the Gate length.

Another fun one is to set it to Bank 0, VCO mode, turn the Bend pot fully CCW for growling mode and then play with the Sound, Pitch and Speed pots.

Try also to press the rotary button while the Sound entry is being sequenced in VCO mode to hold notes on and manually alter the sequence.
Do you have a nice patch to recommend ?
Thanks in advance for sharing


Talko 1.2 is coming soon

Talko is an open source Arduino based LPC speech synthesizer. It’s firmware can be updated via the onboard USB port, using the standard Arduino IDE.

In Speech mode, the speech starts with a gate signal and complete before waiting for a new gate signal. The speech has the priority.

In Repeat mode, the speech starts and stops with the gate signal going high or low. The gate has the priority and the speech repeats while the gate is high. This mode is very useful to create crazy rhythms.

In VCO mode, the LPC engine loops while the gate is high, producing steady notes.

The VCO mode can also produce sounds using white noise instead of tones, making strange throat like sounds.

The sound synthesis can be is driven via CV signals or knobs to choose sounds and alter pitch, speed & bending.

Talko1.2

flyer1.2.pdf