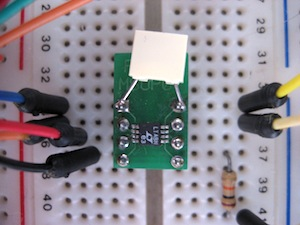
Having a working Votrax SC-01A hooked to an Arduino, I wanted to test the inflection bits to hear their influences on the speech.
Inflection
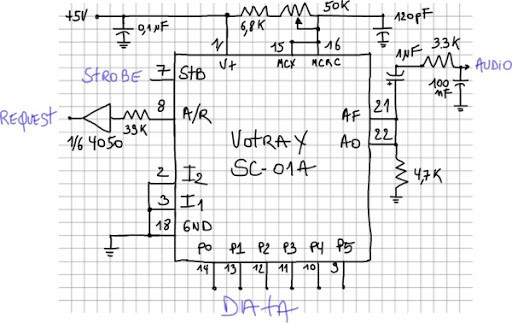
To get the inflection working we need to toggle the to inflection bits low or ligh. The Votrax’s inflection entries are CMOS level, so we need to adapt them for the arduino (see http://pcbheaven.com/wikipages/Interfacing_ICs/). The two entries are forced to high via 2 resistors and connected to the Arduino pin 4 & 5 (see code at end of page).

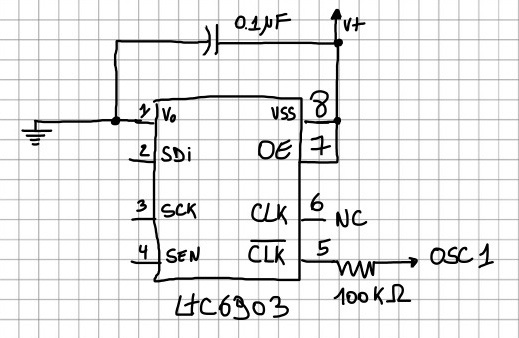
Inflection setting are pretty coarse : toogling the inflections bits gives a strong variation to the voice. I plan to add a digitally controlled pitch using a LTC6903 as done with the SP0-256 AL2. See http://polaxis1.nextmp.net/?p=36
In this first example you can hear the Votrax variation in pitches.(I got some inspiration on the code thanks to the excellent works done for the GinSing shield. See GinSing library & examples V3.0)
 byte inflection[]={
    _INFL0,_V,_O,_T,_R,_UH,_K,_S,_PA1,  // Votrax
    _INFL1,_V,_O,_T,_R,_UH,_K,_S,_PA1,
    _INFL2,_V,_O,_T,_R,_UH,_K,_S,_PA1,
    _INFL3,_V,_O,_T,_R,_UH,_K,_S,_PA1,
    _STOP  };

speak (inflection);

delay(2000); // delay 2 sec between repetition
Holding vowels & inflection changes
To try to sing, I also added somes delays to force hold the vowels in an attempt to mimic Kraftwerk style
byte radioactive[]={
    _INFL2,
    _T,_CH,_ER,_HOLD1,_N,_O,_HOLD1,_B,_INFL3,_I,_HOLD1,_L,_PA1,_HOLD1,_INFL1,       // Tchernobyl
    _H,_A1,_HOLD1,_R,_E,_HOLD1,_S,_B,_ER,_HOLD1,_G,_HOLD1,                          // Harrisburg
    _S,_EH1,_HOLD1,_L,_AH2,_HOLD1,_F,_INFL2,_E,_HOLD1,_L,_D,_PA1,_INFL2,_HOLD1,     // Sellafield
    _F,_U,_HOLD2,_K,_U,_HOLD2,_SH,_E,_HOLD2,_M,_INFL0,_AW2,_HOLD2,                  // Fukushima
    _STOP  };

  speak (radioactive);
Manual Timing
Finally I added a potentiometer and a switch to replace the normal and individual phoneme timing by an artificial one to make it sound more robotic. If the switch is on, the sketch read the pot value and force all the phonemes to be sustained for certain time (from 30 to 300 ms)
Here is the code :
/* Votrax SC-O1A Speech Chip
 Sing n' Speech Processor
 Arduino Uno

 **********************************************************************
         ___   ___
 Vp   1 |*  \_/   | 28  A0
 I2   2 |         | 21  AF
 I1   3 |         | 20  CB
 NC   4 |         | 19  NC
 TP3  5 | Votrax  | 18  Vg
 TP2  6 | SC-01 A | 17  TP1
 STB  7 |         | 16  MCRC
 A/R  8 |         | 15  MCX
 P5   9 |         | 14  P0
 P4  10 |         | 13  P1
 P3  11 |_________| 12  P2

 **********************************************************************
 */

int sensorPin = A5; // Manual timing via potentiometer as voltage divider on pin 5

#define PIN_STB 2  // Strobe need to go high to latch datas
#define PIN_AR 3   // Acknowledge/Request goes high when ready
#define PIN_I1 5   // Inflection bit1 (votrax pin 3)
#define PIN_I2 4   // Inflection bit2 (vot pin 2)

#define PIN_TIMING 7 // read the switch's status

// define all the phonemes

#define _EH3 0x00 // 59 MS ;JACKET
#define _EH2 0x01 // 71 MS ;ENLIST
#define _EH1 0x02 // 121MS ;HEAVY
#define _PA0 0x03 // 47 MS ;NO SOUND
#define _DT 0x04 // 47 MS ;BUTTER
#define _A2 0x05 // 71 MS ;MADE
#define _A1 0x06 // 103MS ;MADE
#define _ZH  0x07 // 90 MS ;AZURE
#define _AH2 0x08 // 71 MS ;HONEST -
#define _I3  0x09 // 55 MS ;INHIBIT
#define _I2  0x0A // 80 MS ;INHIBIT
#define _I1  0x0B // 121MS ;INHIBIT
#define _M  0x0C // 103MS ;MAT
#define _N  0x0D // 80 MS ;SUN
#define _B  0x0E // 71 MS ;BAG
#define _V  0x0F // 71 MS ;VAN
#define _CH  0x10 // 71 MS ;CHIP
#define _SH  0x11 // 121MS ;SHOP
#define _Z  0x12 // 71 MS ;ZOO
#define _AW1 0x13 // 146MS ;LAWFUL
#define _NG  0x14 // 121MS ;THING
#define _AH1 0x15 // 146MS ;FATHER
#define _OO1 0x16 // 103MS ;LOOKING
#define _OO  0x17 // 185MS ;BOOK
#define _L  0x18 // 103MS ;LAND
#define _K  0x19 // 80 MS ;TRICK
#define _J  0x1A // 47 MS ;JUDGE
#define _H  0x1B // 71 MS ;HELLO
#define _G  0x1C // 71 MS ;GET
#define _F  0x1D // 103MS ;FAST
#define _D  0x1E // 55 MS ;PAID
#define _S  0x1F // 90 MS ;PASS
#define _A  0x20 // 185MS ;DAY
#define _AY  0x21 // 65 MS ;DAY
#define _Y1  0x22 // 80 MS ;YARD
#define _UH3 0x23 // 47 MS ;MISSION
#define _AH  0x24 // 250MS ;MOP
#define _P  0x25 // 103MS ;PAST
#define _O  0x26 // 185MS ;COLD
#define _I  0x27 // 185MS ;PIN
#define _U  0x28 // 185MS ;MOVE
#define _Y  0x29 // 103MS ;ANY
#define _T  0x2A // 71 MS ;TAP
#define _R  0x2B // 90 MS ;RED
#define _E  0x2C // 185MS ;MEET
#define _W  0x2D // 80 MS ;WIN
#define _AE  0x2E // 185MS ;DAD
#define _AE1 0x2F // 103MS ;AFTER
#define _AW2 0x30 // 90 MS ;SALTY
#define _UH2 0x31 // 71 MS ;ABOUT
#define _UH1 0x32 // 103MS ;UNCLE
#define _UH  0x33 // 185MS ;CUP
#define _O2  0x34 // 80 MS ;FOR
#define _O1  0x35 // 121MS ;ABOARD
#define _IU  0x36 // 59 MS ;YOU
#define _U1  0x37 // 90 MS ;YOU
#define _THV 0x38 // 80 MS ;THE
#define _TH  0x39 // 71 MS ;THIN
#define _ER  0x3A // 146MS ;BIRD
#define _EH  0x3B // 185MS ;GET
#define _E1  0x3C // 121MS ;BE
#define _AW  0x3D // 250MS ;CALL
#define _PA1 0x3E // 185MS ;NO SOUND
#define _STOP 0x3F // 47 MS ;NO SOUND

#define _END 99  // End of phrase

#define _INFL0 100 // Inflection 0 (default mode)
#define _INFL1 101 // Inflection 1
#define _INFL2 102 // Inflection 2
#define _INFL3 103 // Inflection 3
#define _HOLD1 200 // wait 300 ms
#define _HOLD2 201 // wait 600 ms


void setup()
{

  DDRB = B00111111; // set Port B 6 lowest bit as Output (Arduino Uno pin 8 to 13)

  pinMode(PIN_TIMING,INPUT);

  pinMode(PIN_STB, OUTPUT);
  pinMode(PIN_AR, INPUT);

  pinMode(PIN_I1, OUTPUT);
  pinMode(PIN_I2, OUTPUT);

  digitalWrite(PIN_I1, LOW);  // default to no inflection
  digitalWrite(PIN_I2, LOW);  // default to no inflection

  digitalWrite(PIN_STB, LOW);   // must stay low


}


void loop()
{

  byte radioactive[]={
    _INFL2,
    _T,_CH,_ER,_HOLD1,_N,_O,_HOLD1,_B,_INFL3,_I,_HOLD1,_L,_PA1,_HOLD1,_INFL1,       // Tchernobyl
    _H,_A1,_HOLD1,_R,_E,_HOLD1,_S,_B,_ER,_HOLD1,_G,_HOLD1,                          // Harrisburg
    _S,_EH1,_HOLD1,_L,_AH2,_HOLD1,_F,_INFL2,_E,_HOLD1,_L,_D,_PA1,_INFL2,_HOLD1,     // Sellafield
    _F,_U,_HOLD2,_K,_U,_HOLD2,_SH,_E,_HOLD2,_M,_INFL0,_AW2,_HOLD2,                  // Fukushima
    _STOP  };

  //speak (radioactive);

  byte votrax[]={

    _INFL0,
    _V,_O,_T,_R,_UH,_K,_S,_PA1,                     // Votrax
    _INFL1,_EH1, _EH2, _S,_PA0,                     // S
    _S, _E1, _Y,_PA0,                               // C
    _Z,_AY,_I1,_R,_O1,_U1,_PA0,                     // Zero
    _W,_UH1,_UH2,_N,_PA0,                           // One
    _A,_AY,_Y,_PA1,_INFL2,                          // A
    _S,_P,_E1,_Y,_T,_CH,_PA0,                       // Speech
    _S,_I,_N,_T,_EH2,_S, _E,_Z,_ER,_PA0,_INFL3,     // Synthesizer
    _R, _EH1, _EH3, _D, _Y,_STOP  };                // Ready

    speak (votrax);

  byte inflection[]={
    _INFL0,_V,_O,_T,_R,_UH,_K,_S,_PA1,          // Votrax
    _INFL1,_V,_O,_T,_R,_UH,_K,_S,_PA1,
    _INFL2,_V,_O,_T,_R,_UH,_K,_S,_PA1,
    _INFL3,_V,_O,_T,_R,_UH,_K,_S,_PA1,
    _STOP  };

    //speak (inflection);


  delay(2000); // delay 2 sec between repetition

}


void speak (byte* message){

  int i=0;
  do
  {
    say(message[i]);
    i++;

  }
  while (message[i-1]!=_STOP);

}


void say(byte phoneme) {

  if (digitalRead(PIN_TIMING) ==1) {          // Read the switch's status
    //  Wait for PIN_AR=1 when chip is ready : internal timing
    while (digitalRead(PIN_AR) == 0);
  }
  else                                       // if switch is low get timing via pot's value
  {
    int sensorValue = analogRead(sensorPin);
    int sustain = map (sensorValue,0,1023,40,300);
    delay(sustain);
  }
  switch (phoneme) {
  case _INFL0:
    digitalWrite(PIN_I1, LOW);
    digitalWrite(PIN_I2, LOW);
    break;

  case _INFL1:
    digitalWrite(PIN_I1, HIGH);
    digitalWrite(PIN_I2, LOW);
    break;

  case _INFL2:
    digitalWrite(PIN_I1, LOW);
    digitalWrite(PIN_I2, HIGH);
    break;

  case _INFL3:
    digitalWrite(PIN_I1, HIGH);
    digitalWrite(PIN_I2, HIGH);
    break;

  case _HOLD1:
    delay (300);
    break;

  case _HOLD2:
    delay (600);
    break;


  default:
    PORTB =  phoneme;


    // Set PIN_STB = 1 for 2usec to tell the chip to read the Port
    digitalWrite(PIN_STB, HIGH);
    delayMicroseconds(2);
    digitalWrite(PIN_STB, LOW);


  }
}


