Emy Kit
See the assembly manual
See the assembly manual
Prepare your text file in Romaji and have Kaiwa read it out loud for you!
Just in case you wonder how Romaji look like: here is the Japanese lyrics of Kraftwerk’s Radioactivity :
cherunobuiri
harisuba-gu
serafi-rudo
hiroshi-ma
fukushi-ma
nihon,demo,houshanou
kyoumo,itsumademo
fukushima,houshanou
kuuki,mizu,subete
nihon,demo,houshanou
i-ma--sugu,ya-mero-
note: the hyphen is used to prolong the vowels (see the Kaiwa-vox’s manual for more on this)
Group your lines into a song and save it as a text file on the SD card :
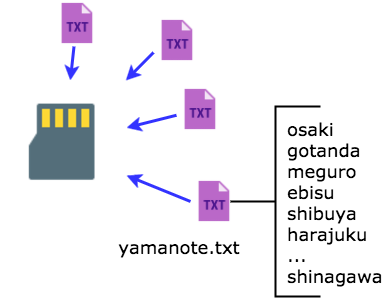
On Kaiwa, manually pick a song and use the Sound pot or its CV entry to pick the line in that song.
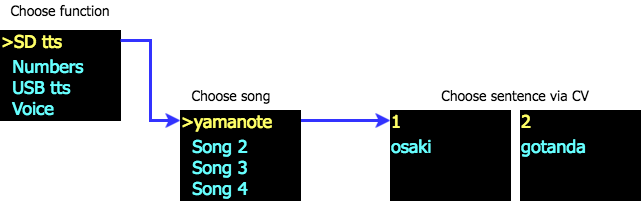
A gate signal will trigger the sound while the various pot and CV entries allow tweaking the voice characteristics before processing the speech (not in real-time, but they are applied on the next utterance).

(if you need to get started with a new sd card)

This little demo to shows how to use the USB TTS mode on Kaiwa. This function is designed to help you debug your Japanese romaji lines before storing them into a text file for the SD card. (see the user manual for more details).
The speech is triggered by the gate signal, so this mode can also be used to edit and play live text.
(if you need to get started with a new sd card)
The MIDI version of the code (see above in Firmware) works great with this Ableton preset file


https://www.youtube.com/embed/JkEYwAl6exk
//platform.instagram.com/en_US/embeds.js
//platform.instagram.com/en_US/embeds.js
Polaxis T-Shirt size Europe
(if you need to get started with a new SD card)
The firmware has a MIDI function :
– MIDI note assigned to 39 phonemes.
– Velocity and Pitch bend supported.
– Can hold the note for singing effect.
The hardware is compatible with the mikroBUSTM standard, allowing rapid prototyping and easy integration into existing projects.
The onboard class-d amplifier can drive a small 8 ohms speaker.
This vox board was designed to be used with EMY and its appropriate firmware. (in this case, the audio signal is forwarded via the “PWM” pin – the jack is not used with Emy)
It can also be used in robots, toys, or any other retrocomputing speaking devices you may think of.
Thanks to the popular mikroBUS™, this board can be instantly connected to multiple different platforms like the Arduino, the STMT32 of the Clicker2.
The onboard amplifier is quite powerful and is just waiting for the speaker to be plugged in!
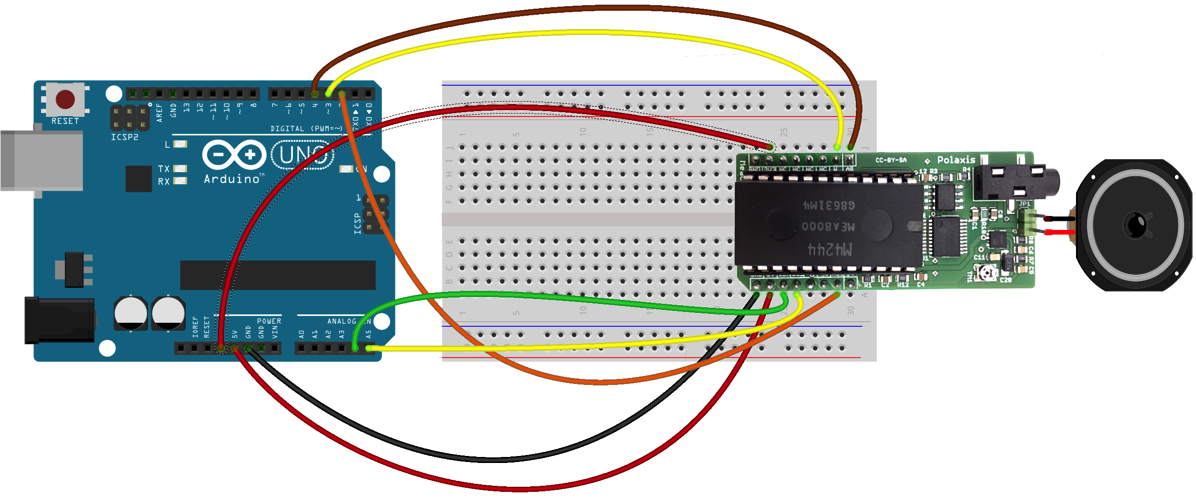
The code is available here
The chip can string phonemes to produce quite realistic speech (although with a French accent). It can also sustain notes for a nice singing effect. Here is how the Arduino code looks like :
dire("/bonj+w_r");
delay(400);
dire("&l&kt€Ronik miwzik");
delay(400);
dire("i$ b+i-n ka+I+n -ma/$=+_ine");
delay(400);
dire("+?je pE ossi murmur*?");
delay(400);
dire("je suis un arduino qui parle"); // à corriger ;-)
delay(400);
You will find more information about the various phonemes and the prosodic markers in the following manual.
Voir cette publication sur Instagram
Voir cette publication sur Instagram
Voir cette publication sur Instagram
Kaiwa Vox is a text-to-speech add-on board with a Japanese robotic voice.
It just needs to receive an ASCII string of Romaji Japanese to start speaking.
The speech engine recognizes text and various speech modifiers to improve prosody.
The chip can also vary the speech’s speed, pitch, and accent.
The hardware is compatible with the mikroBUSTM standard, allowing rapid prototyping and easy integration into existing projects.
The onboard class-d amplifier can drive a small 8-ohms speaker.
A LED turns on when the chip has finished talking and is ready to proceed.
This vox board is designed for Emy or Terminal (in this case, the audio signal is routed via the “PWM” pin – the jack is not used here)
It can also be used in robots, toys, or any other speaking device you may think of.
Thanks to the popular mikroBUS™, this board can be connected to multiple platforms like the Arduino or the STM32.
The onboard amplifier is quite powerful and is just waiting for the speaker to be plugged in!
#include "AquesTalk.h"  // http://www.a-quest.com/download/package/Arduino_AquesTalk_Library.zip
#include

/*

         +-----------------+
         |[ ]NC      OUT[ ]| Audio
       3 |[ ]RST   !PLAY[ ]| 2
         |[ ]NC       NC[ ]|
         |[ ]NC       NC[ ]|
         |[ ]NC      SCL[ ]| A5
         |[ ]NC      SDA[ ]| A4
         |[ ]3V3      5V[ ]| 5V
         |[ ]GND     GND[ ]| GND
         +________________/
*/

AquesTalk atp;  // I2C address : 0x2E
#define RESET 3
#define NPLAY 2 // busy playing when LOW


void setup()
{
    pinMode(RESET, OUTPUT);
    digitalWrite(RESET, HIGH);
    pinMode(NPLAY,INPUT_PULLUP);

  delay(100);
  atp.Synthe("konnnichiwa.");

}

void loop()
{
   atp.Synthe("arigato.");
   atp.SetAccent(random(200));
   atp.SetPitch(random(200));
   atp.SetSpeed(random(200));
   atp.Synthe(".");

}
The Arduino code is available here.
This module is performing real-time LPC synthesis to produce an intelligible voice or … not if you choose to.
The module produces sounds in 3 major modes: Speech, Repeat, and VCO.
Talko is an Arduino-based synthesizer developed under open-source hardware and software. (license CC-BY-SA)
Its firmware can be updated via the onboard USB port.
Please note that building & coding this module requires minimum Arduino knowledge like installing a com port, installing libraries & uploading code.
– format: Eurorack
– width: 10hp
– depth: 30 mm skiff friendly
– power: + 12V: 65 mA via 10 pin Doepfer power bus
– audio: un-filtered 5V PWM carrier at 62500 Hz
– inputs: protected against over or under voltage by clipping from 0 to +5V
The user manual can be found here: https://www.polaxis.be/wp-content/uploads/2016/05/Talko-Manual-1_2.pdf
https://github.com/deladriere/euro-modules/tree/master/Talko


